Proxmox on a server from STRATO
Installation on the STRATO server
In this chapter, after the many preparations in the VM at home, the server at STRATO is finally installed with the image. After installation, the Proxmox server is located on the rented server in the Internet and no longer at home in a
VirtualBox VM. This procedure requires a few steps. Some settings could not yet be set in the VM because they would not work in your environment. The settings are now updated here so that Proxmox can be operated on the real server.
Preconditions
At the beginning of the preparation shown, it was pointed out to set up the server at STRATO. Some settings were taken over from the STRATO setup because they have to be transferred to the Proxmox system when it comes to the real server.
Furthermore, STRATO only allows access to the server once it has been installed.
A virtual machine was set up to prepare a Proxmox image. This must now be switched off so that the next steps can be carried out. Below is a step where the image is copied to the rented server via SSH. This step is shown for VirtualBox
because VirtualBox was used for the VM preparations. In principle, what is shown can also be done with other software solutions. It should be mentioned here: If another software does not offer a comparable function for image access as is
possible here via VirtualBox, the VM can also be copied from the inside of the VM to the real server via SSH. In this case, the VM will now restart with a Linux (desktop/text console) instead of shutting down. This must be done so that the
Proxmox is not copied while it is running.
Coping the Proxmox image to the server
The server should be copied by using a SSH tunnel 1:1 to the STRATO server. This needs two steps which can be done parallel.
Hint: This instructions here belong to my first setup where I had 1 SSD without a RAID and 2 HDD with a RAID.
Restarting the STRATO server into the rescue boot
On the server side of STRATO you have to switch to the server's rescue boot. To do this, you have to log in to your own server on the server login page or have the customer login redirect you there.
Navigate to “Backup & Recovery” in the menu and select the “Rescue Boot” menu item. On the selection you can choose which source the server should choose for the operating system. By the way: This can be changed
independently from the outside. The boot loader on the data storage media is not relevant for this. The server always tries to start from the STRATO network first. If you have set the server to "Standard OS", the boot loader from
the STRATO network redirects the boot to the hard drive(s) or SSD(s) installed in the server. If you switch the server to the "Rescue OS" in the server login view, a different bootloader setting is created in the STRATO network,
which loads the Rescue OS from the STRATO network.
The Rescue OS is now required to have independent access to the server. You select the “Rescue OS” setting. In the lower selection you can determine whether the server is restarted by disconnecting the power connection or
whether you want to restart it using a manual command on the console. Strictly speaking, it doesn't matter what you choose at this point, because the system that is currently running will be overwritten next. The changeover process takes up
to 10 minutes. Only when this is complete can the server be restarted manually if "Soft Reboot" has been selected. During this time you can begin the next step.
Please save configuration files, which will be edited below, at the least when the server has arrived in STRATO's Rescue OS. Either you download it or copy the content into an editor. I had an advantage and had the hard drives, which are
not touched here. I saved a disk dump and a tar archive from STRATO Debian on this. I later unpacked this into the Proxmox installation and obtained the configuration files from there.
Convert the Image and upload it to the sever
The VM at home was prepared with VirtualBox. VirtualBox offers the user the file formats ".vhd", "vdi" and ".vmdk" for virtual hard drives. These files contain slightly more than the virtual disk data blocks.
Uploading via an SSH connection now requires that these files can either be integrated into the host as a data medium or converted into a raw data image file. This means that the virtual hard drive cannot be unpacked as an image onto the
hard drive/SSD of the server at STRATO.
As a tool, “dd” is supposed to read the image file on the host and send the output through an SSH pipe. At the same time, "dd" is used on the server to take the data from the SSH pipe and write it to the server's hard
drive / SSD. Adjustments due to the differences between the VM and the “real” server are made after that.
Convert the virtual hard drive
Unfortunately, in order to convert the virtual hard drive, you need to know the UUID of the file. This is not a value that just catches the eye. In addition, the command to convert the file can only be issued on the command line. This works
exactly the same as under other OSs that run VirtualBox. On Windows you just have to open a command prompt / Power Shell and go to the VirtualBox installation directory. In the unchanged case, the command for the Windows user is cd C:\Program Files\Oracle\VirtualBox\. In any case, the UUID of the virtual hard drive must now be found. A UUID is typically written in curly brackets and consists of hexadecimal numbers with hyphens. You can
find the UUID of the hard drive by clicking on the menu function in the left half of the management window under "Tools" and then on "Media" (Figure 1). You activate the display of properties on the right and select the
“Information” tab in the bottom part (Image 2). All discs are listed in the middle. You can find out by the name (see VM Information) which hard drive you need. I took a snapshot of the VM after each step in my setup. That's why
the list here is splitting into several entries. You need the UUID from the bottom file. I can select these with one click and copy them with a right click.
I have included the command needed to convert below with the UUID of the hard drive in my setup. You write this command in the input, adjusting the UUID accordingly. Another 8GB file will be created.
                            VBoxManage clonemedium {d0765395-081b-4fe2-a31a-32b73cc65269} \
pveProv.img --format RAW
Click image to zoom.
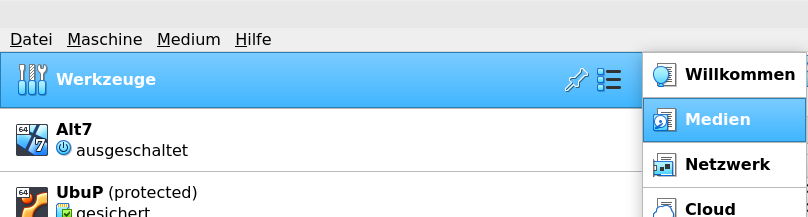
Figure 1: VirtualBox Menu selection for disk overview
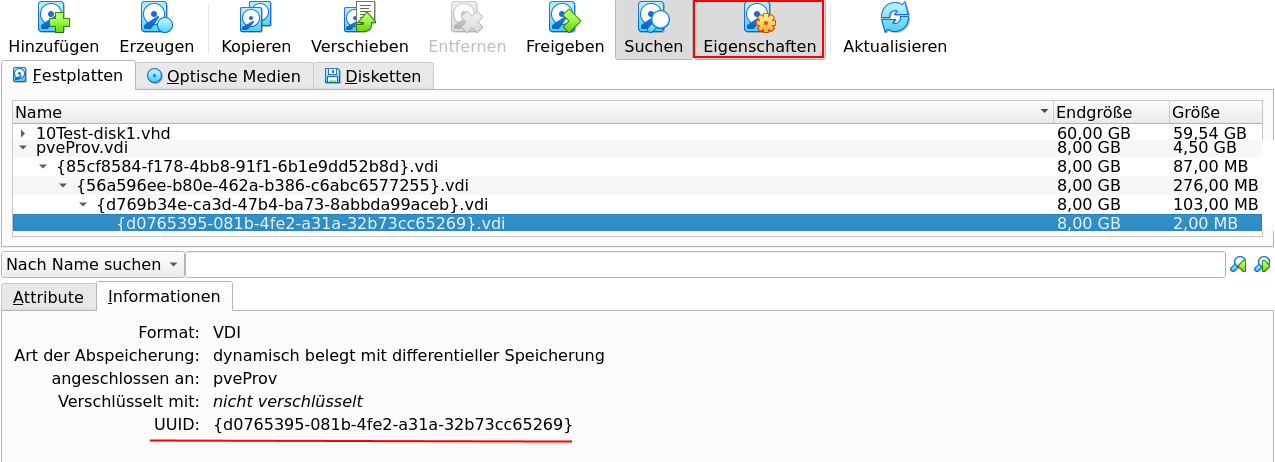
Figure 2: VirtualBox - Display of the UUID to take for converting the virtual disk
Push the Imagefile to the server
For the next step, the STRATO server must have arrived in the rescue boot. You can log in there with the user root. The SSH server runs on the standard port 22. The password for the user has been generated and can be found in the server
login under "Server data". The best way to get an overview of what the hard drives / SSDs are called is to use lsblk. Depending on how many devices there are in the server, you get a list of
different lengths. I have a server with 1x SSD on which STRATO Debian was installed and 2x hard drive. On the one hand, the hard disks are larger and have a large partition for soft raid. Based on the existing partitions, I could see that
the hard disks were not my target. There are several partitions created on the SSD, which made it clear to me that the OS was installed there. I had to remember the device name (/dev/sda) for a short
time.
Using the command shown below, I then wrote the image file I had just converted to the server's SSD. dd is used here to process the image file and write it to the SSD. The data stream is tunneled from home
to the server on the Internet via SSH. To speed up the upload, gzip with high compression is inserted in between. If you send the command, you will first be asked for the password for the user root on the
server. So insert the password from the server login here again. The process at home then shows you the transferred data. The SSD on the server will now be overwritten. Incidentally, the Proxmox OS has to be on the SSD because the server
will only look for a bootable OS there. When the process is finished, the work at home is finished. The image file created previously can be deleted. It now only continues on the rented server.
                    dd if=pveProv.img status=progress | gzip -c -9 | ssh stratoserver \
'gzip -d | dd of=/dev/sda'
Post steps after the deploying
With the completion of the copying process, the Proxmox has basically arrived on the server. All further steps now take place on the STRATO server. Basically, the copying process only transferred the Proxmox data, including the
partitioning. Everything is still in the same state that it was adapted to the preparation in the VM. Now it's about the downstream adaptation to the real server.
Resize partitions
To speed up the transfer of the image file to the server, only an 8GB virtual hard drive was created for the VM. This has the disadvantage that although the SSD is 128GB in size, only 8GB is used. That's why "root" is now expanded
to cover the entire SSD. It would also be possible to leave the space and use it for VMs of the new Proxmox, but this setup doesn't make sense here. The hard drives should be used for the VMs.
After transferring from home, the LVM immediately recognized that there were new volumes and activated them. This prevents enlarging. You deactivate the use of volumes with the vgchange -a n command. fdisk
is then called with the SSD fdisk /dev/sda. It gives some warnings (see image 3). But these are OK and are related to the transport of the VM. In order to enlarge the partition, the partition that contains
the LVM PV must first be enlarged. Because “root” is in there. This is explained to fdisk by deleting and re-creating with maximum size. I have created a screenshot (Figure 4) of the entries made. Once you've finished that, type
"w" and press Enter. "fdisk" now changes the partitions up to the end of the SSD.
Unfortunately you have to restart the server now. This is how the kernel and LVM process the changes. The restart can simply be done with reboot. The password for “root” remains the same.
Once the server has started again in the Rescue OS and you are logged in, you still need to enter a command. This is below. You increase the LV for the "root" volume. When the command completes its work successfully, it implicitly
causes the ext4 file system to be further expanded to full size.
lvextend -r -l 100%FREE /dev/pve/root
Click image to zoom.
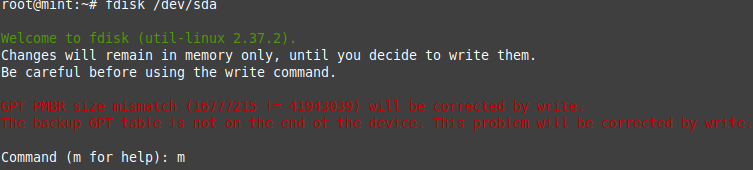
Figure 3: Warning from the fdisk command when it is started after importing the disk image
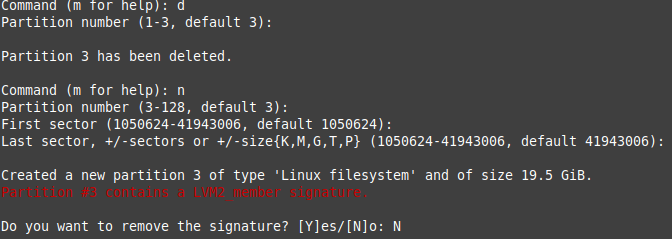
Figure 4: Steps to do in fdisk to enlarge the LVM PV
Complete configuartions
There are still a few settings left open from the preparation in the VirtualBox environment that now need to be set before the server starts Proxmox on the STRATO server for the first time. This is partly important so that the server runs
correctly in the new environment and is accessible. The server should still be in STRATO's Rescue OS after adjusting the disk size. In order to be able to carry out the steps below, a “change root (chroot)” is made into the
Proxmox OS. Below is a list of commands that set up the "chroot" and switch to a shell in it. The commands apply so that, as in my case, Proxmox is installed on "sda". Specifically for the Proxmox OS boot setup: Neither
a boot partition nor an EFI partition needs to be integrated!
                    mount /dev/pve/root /mnt

                    mount --bind /dev /mnt/dev

                    mount --bind /dev/pts /mnt/dev/pts

                    mount --bind /sys /mnt/sys

                    mount --bind /proc /mnt/proc

                    mount --bind /run /mnt/run

                    chroot /mnt /bin/bash
Network Interfaces
In Chapter 02 the network settings for the server were mentioned. Furthermore, some settings were set, such as changing the "vmbr0" and "enp0s3" for NAT mode operation. The IP address and
subnet (CIDR notation) as well as the gateway had to be left at the network settings from VirtualBox. Now these settings must be adjusted to the “real” server. Furthermore, the name of the network interface changed in this case,
which is why the file had to be adapted for this too. Note: Under "vmbr0" there is the instruction "bridge-ports...", which is not shown in the example below. If this setting is not set to "...none", please
enter the same name of the network interface here (in the example "eno1").
Change from:
                                auto enp0s3

                                iface enp0s3 inet static

                                    address 192.168.55.4/24

                                    gateway 192.168.55.1
Change to (data changed for demo):
                                auto eno1

                                iface eno1 inet static

                                    address 85.214.5.42/32

                                    gateway 85.214.254.42
Fixup of the hostname
In Chapter 02 the output of the hostname setting and the so-called "Hosts" file was shown. No adjustment was necessary for the preparation in the VM. But now this needs to change.
The file /etc/hostname contains the host name without a domain. Here you just need to append “.stratoserver.net” to the entry (h0000000).
The domains are correctly listed in the file /etc/hosts. However, in front of it is the IP address from the VirtualBox VM. Here the IP is changed to the IP address that the server actually has.
The server has the settings for the DNS server it should query in the file /etc/resolv.conf. The domain of the server is also specified there. You should keep the values from the STRATO Debian file
here. If you want to set another DNS server from the Internet (e.g. CloudFlare or Google), you can enter the IP addresses of the servers there.
Re-enable the Serial Console
Chapter 04 showed why the serial console is useful and tested it for VirtualBox as a VE. However, after the test, my advice was to temporarily deactivate the serial console again. Anyone who has done so
should now activate it again.
In the file /etc/default/grub the entries GRUB_CMDLINE_LINUX_DEFAULT , GRUB_SERIAL_COMMAND and GRUB_TERMINAL were left commented out for the upload and one line (kernel parameter) was only copied and changed for the variant without a console. Now everything is being changed again. The line with the kernel
parameters must now contain the values for the serial console again and the other two lines must be there without comments. This is how this file is saved.
To apply the change, you need to run the update-grub command. You may now be asked where Grub2 should be installed. This is due to the new installation on the server. In this case, simply select the same
device on which you previously had the image from home written. In my case that was the SSD, i.e. "dev/sda".
I recommend activating the console server in the server login and using the SSH command to connect, which is displayed in the server login. You can immediately test whether the console settings are correct and see the server start. If
something doesn't fit, you'll see it straight away. Further note: Deactivate the console server access in the server login after you are finished and exit the console shell with exit!
After the changes shown above have been made, the server can finally start the Proxmox OS. If you are still in the "chroot" you leave it with a exit and all mount commands from above are undone in the
reverse order with a umount /....../...... Now reset to “Standard operating system” in the server login under “Rescue OS”. Please use the lower setting “No hard reboot” so
that the Proxmox installation is not damaged. Also stay logged in to SSH. You have to wait another 1-10 minutes for the change to take place. As soon as the server login shows that the change has taken place, restart the server with a reboot. Now it should start the Proxmox OS and you should see on the serial console that the Proxmox can now be reached under hostname and port 8006. That's almost true, because in Chapter 03 the firewall was set so
that access can only be done via SSH. If you set the SSH configuration for the server to the hostname of the "real" server as shown in this chapter, you should be able to a) connect via SSH and then b) access
"https://localhost:8006". Then the Proxmox arrived on the STRATO server.
Special one more thing for servers with extra hard disks
In addition my first server had next to the SSD on which Proxmox was then installed also two hard drives. These were intended to be set up with RAID using a soft RAID solution. I have designated the hard drives for the VMs. Since the
previous installation is already set up as a soft RAID with an ext4 file system, I have to reformat it. You can also install VMs on a simple file system, but this is not the preferred option. The Linux MD RAID is also not recommended.
However, for hard drives in a server, it is recommended to operate the hard drives in RAID. There is a way to format the hard drives with zfs and have them in RAID. This means “zfs-mirror”. The use of zfs is also supported by
Proxmox and can be easily set up via the web interface.
Formating the hard disks with ZFS
Formatting the hard drives is done using Proxmox. The unpleasant thing is, of course, that you have to be careful which Linux device you choose. Typically, the setup is easy because the hard drives are usually the same size and usually the
same models from the same manufacturer. The overview of all devices can be seen in Figure 5. You can get to the view by selecting the Proxmox server in the tree structure on the left and clicking on "Disks" in the side menu. You
can recognize the SSD with the OS not only by its telltale identifier. The existing 3 partitions (BIOS boot, EFI, LVM) indicate that the Proxmox OS is installed on the disk. The hard disks only have one partition each.
Now select the hard drive (partitions that may not be recognized, i.e. "/dev/sdb" and "/dev/sdc") and press the "Format" button for each hard drive above the table. To be on the safe side, you will be asked
again if you are sure. If you confirm this, the Linux MD RAID from the old STRATO image will be removed along with the old partition. Nothing new has been created yet. You don't have to create a new partition table. This happens
automatically in the next step.
If the submenu under "Disks" is opened in the side menu (small triangle), you can find "ZFS" at the bottom and click on it. You switch to an initially empty table area where there are buttons again at the top. Clicking
on the "Create: ZFS" button takes you to the dialog shown in Figure 6. This again has a table and should (unlike the image) show the hard drives below. Both are selected with a tick and "mirror" is set in the "RAID
level" setting. This means you have a classic RAID-1, like it was before, only based on ZFS. Of course, only those who have experience with “RAIDz” and want it for specific reasons can select it there. Under
“Name” you enter what the ZFS (and thus the Proxmox storage) should be called. I left the other settings as they were and confirmed them. Then Proxmox creates GPT partitioning on the disks and creates the ZFS pool from both with
mirror. The “Disks” table will then look something like Figure 5. Now you can save VMs, containers, etc. on the hard drives.
Click image to zoom.
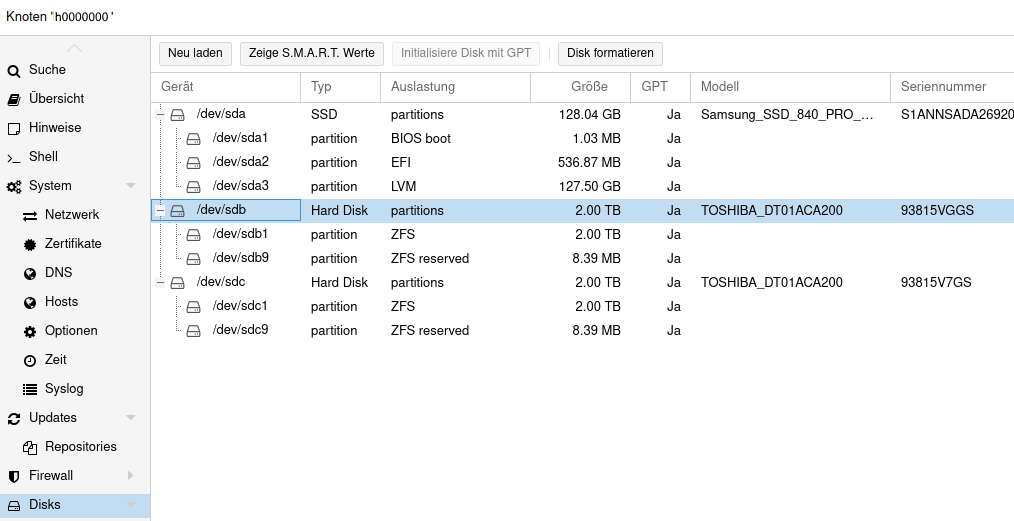
Figure 5: Tableview in the Proxmox for the Disks
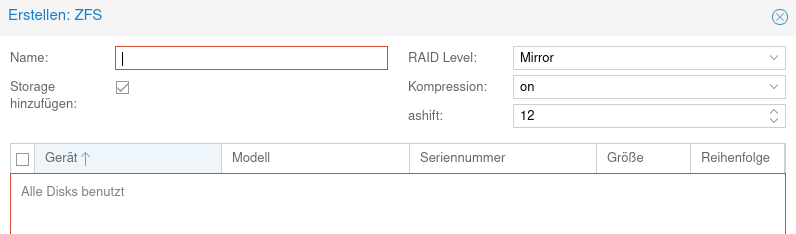
Figure 6: Dialogue of Proxmox to setup a new ZFS