Proxmox on a server from STRATO
Configuration of the Serial Console
This chapter is about the serial console and its configuration for the Proxmox server. This is a special chapter because it is specifically about the STRATO server. As explained on the intro page, the serial console is a special way to have
access to the server, independent of network and services. It's an (old) way to have a screen (replacement) access. The console only exists on the STRATO server and can only be activated via actions in the server login of STRATO. In the
previous chapters, a Proxmox was installed at home in a VM (VirtualBox) for image preparation. In VirtualBox, a screen replacement with a serial console is neither provided nor necessary. With this VM you have a “real” virtual
screen on which you can make entries and where you can even see graphical interfaces. However, if the Proxmox will be moved from the VM at home to the server at STRATO in one of the following chapters, the serial interface should also work
there. This chapter shows the setting and how you can test it at home under VirtualBox.
Why the serial console should be setup
Why should you activate the serial console for a Proxmox server when it runs on a server at STRATO? Why should you go to the trouble of setting up when using a VirtualBox VM that doesn't offer a serial port as a screen replacement and
doesn't need it?
As a reminder: The server at STRATO does not offer us a screen or other remote control options that are connected to the server from outside. It's not about permanent use either. The serial console is actually not used all the time either.
Normally you would connect via SSH and possibly also access the web interface. So in both cases you have a better console. Apart from that, Proxmox displays and manages important information via the web interface. The Proxmox doesn't
display much on the local screen output (or later the serial output). You can control it there, but you won't want it that way. You wouldn't go to a server and operate it with a real keyboard, nor would you necessarily want to do that via
the serial console.
But the serial console is not an additional feature like a free SSL certificate. It's a rescue access method when nothing works properly anymore. If you have made IP settings and made a mistake, you can no longer log in via SSH. You don't
even have to mis-adjust anything. What if you think the server won't start because you still can't connect after restarting. The serial console is independent and you can also use the rented server in such cases.
Therefore, this function should not be forgotten and is best set up before installation on the server at STRATO. Basically everything works because Proxmox is just a Debian Linux.
Enabling the Serial Console
In order to be able to activate and test the serial console, you don't even have to install anything later in Proxmox. You already have everything you need. Outputting program output and interacting via serial port is a old hat in Linux.
The function comes via the Linux kernel, which every Linux has. These functions are also included in the Proxmox kernel. You just have to tell the kernel to turn it on and on which interface. A few settings are required (as usual with
serial interfaces), I'll list them below. Furthermore, the boot manager Grub can support serial ports. This is again a basic component of the system and here too you just have to activate the settings.
The following is what you need to know about the serial interface at STRATO:
- Baudrate: 57600 Baud
- Length of netto data: 8
- Parity: No parity (N)
- Stop Bits: 1
- Interface enumeration: 0 (Linux: ttyS0)
Doing settings on Grub for activating
The settings are made in a configuration file that controls the Grub boot manager. The information for using the serial interface is communicated to the kernel as so-called kernel parameters. The Grub boot manager does this when the system
starts. Therefore, the kernel parameters are created in the Grub configuration file. A setting is also stored there that enables Grub itself to use the serial interface.
The configuration file can be found under "/etc/default/grub". The variable assignment to GRUB_CMDLINE_LINUX_DEFAULT= can be found relatively high up. This
assignment usually contains "quiet splash". All you have to do is add console=tty0 console=ttyS0,57600 to this assignment (order doesn't matter).
The instruction GRUB_TERMINAL=console is already commented out (with the "#"). Removed the "#" and inserted a new instruction GRUB_SERIAL_COMMAND="serial --speed=57600 --unit=0 --word=8 --parity=no --stop=1" underneath and saved the changes. Now a command still needs to be executed. The update-grub command regenerates the instructions for the Grub boot manager, which also contain the kernel variables. The Proxmox has a special feature: It has two boot partitions. One is for the old boot variant
(legacy mode) and the other for the more modern mode (UEFI mode). The changes have to be applied to both partitions, but the “proxmox-boot-tool” takes care of this automatically. It is also executed automatically when you
trigger the above command.
If the command has been executed successfully, the console will be active the next time the VM/server is started. A few more things are necessary for testing in VirtualBox.
Temporary turn off this function
You can also simply deactivate the console again. It is recommended to do this while you are still working on the VM at home. After you have finished the test (see below), you can simply deactivate the settings on the VirtualBox VM. This
should be done last. Before doing so, you should use the editor in the started VM again to edit the file “/etc/default/grub” again. There isn't much to change.
The variable assignment "GRUB_CMDLINE_LINUX_DEFAULT" must be reduced as before. Here I recommend simply doubling the line by copying it. You comment out the line with the kernel parameters for the console once (with a
"#" at the beginning) and remove the parameters from the assignment in the copied line. If the server is later moved to the STRATO server, you then comment in exactly the opposite way and the console is active again.
The two assignment lines that were added previously, "GRUB_TERMINAL" and "GRUB_SERIAL_COMMAND", are simply commented out.
Then save the file again and run the “update-grub” command mentioned above. Once the command is finished, the VM can be restarted or shut down for reconfiguration in VirtualBox. The next time you start, the console is
deactivated again.
Testing of the setting with the VM at home
In order to test the settings, a few tricks are required. The problem is that the VM doesn't actually provide this function and the Proxmox shouldn't even be uploaded for testing. VirtualBox supports serial ports for virtual machines.
Different connections on the host computer can be used to connect the virtual connection. It is possible to use an interface on the host computer. The file required for this is usually available on a Linux host: “/dev/ttyS0”.
Such interfaces must actually exist on the computer (equal here with Windows). Theoretically, a USB serial port works. But then it also has to be read from the outside. If you want to enter some input, it have to come from there. But not
everyone has this opportunity. Using the device file under Linux is not possible either, because if you try to connect to it from a tool on the host computer, it will not be connected to the VM.
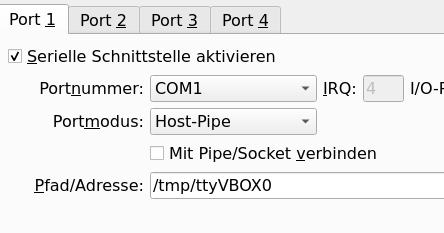
To be able to test input and output, only selecting the “Host Pipe” setting works. You set the setting by entering a path for a pipe file (VM must be switched off). In the picture I have chosen a path under “/tmp”
for my Linux host. If you move the mouse over this text input, you will get information about how entries have to be made there, including host pipe under Windows. Save the changes on the settings done here.
Testing of the serial console with VirtualBox (Linux)
This test approach only works on a Linux as the host system for the Proxmox. The Linux tool “socat” is required here. There is also supposed to be an unofficial port for Windows, but it has not been tested here.
With the "socat" tool it is possible to use VirtualBox's emulated serial terminal (at least I only succeeded with this tool). The tool was not installed on the host computer where I prepared the Proxmox. I installed it very
quickly using “apt install socat” (Debian*).
In order to get the most accurate test possible, including the boot manager, it is necessary to trick the VM. Until the VM is started, the emulated serial port does not yet exist. Until then you cannot prepare access with socat. If you
press the start command for the VM in VirtualBox Manager, you get to the bootloader relatively quickly. But there is a brief moment beforehand where the VM displays a start screen (VirtualBox logo of the version). This is the VM's
"BIOS screen".
You start the VM and quickly select “Machine” > “Pause” in the menu so that it freezes when you reach the start screen. Now you can start “socat” afterwards. Use the command socat unix-connect:/tmp/ttyVBOX0 -,b57600 (space characterization intended) to open the terminal. ATTENTION: "socat" forwards all keyboard input within the window to the emulated serial interface. Once
socat is running, select the same menu items in the VM's menu to continue running the VM. Now the Grub boot manager should appear on the "socat" output. You can then, as later, use the arrow keys to select other menu entries. When
the Proxmox OS starts, the output of "socat" initially shows a lot of text about starting the Linux kernel and services, until finally a login is allowed. In principle, you can log in here by entering the user “root”
and their password (has nothing to do with SSH).
If this test is successful, the serial console works and will later work on the real server. At this point, as explained above, I would deactivate the serial again in Proxmox and especially in VirtualBox.