Raspberry Pi as network backup storage
The idea of the project
Making backups of personal data
It is a good idea to make backups of personal data. Some people use for that and to share thier files a cloud service from a provider. I have many files that have to shared between many local devices. Because this I choose to share my files over a local network with my devices. For this I have a dediced computer that hosts the file shares. But of course therefor is it better to have a backup. NAS servers have just through RAID a backup and often in addition an automated external backup. But I don't have a NAS server in my network. And so I ask me, how to make an automated backup of my personal files. Because it are not only a few giga bytes which are storeable in a cloud. It are tera bytes. I longer have thought about a harddisk in the network where I just have to make copies of my files onto. But therefor I will need a harddisk that runs 24/7 on power, only to access it just once a month. I don't found this a good idea. It will be a better idea to setup it only for the moment of backup and disconnect it after that is done. For doing that I must switch an external harddisk from power. How to build a circuit to do this, I already have the knowledge of an apprenticeship. But at first I didn't have the idea how to switch the power with a computer.
Network backup via Raspberry Pi
Once at time ago, I had the idea. I already thought a long time about a use for may Raspberry Pi. Further I had of a set of actors and sensors which should be used with a Raspberry Pi or an Arduino a relay.
For this part I saw that it can not only be used with DC voltage and up to <= 24V. No it can operate with 230V~ @ 10A. And on the primary side it can be controlled on only 5V DC base.
By checking this, I got the idea that I can control it with the GPIO interface from the Raspberry Pi and so switch my external harddisk on and off. To every needed action the disk volume must only be mounted or unmounted. And when this
works, I can remote switch my harddisk. Just make the device shared and then anyone can make a Backup on the disk - if he/it requests the access to the disk. For doing the backups, rsync was the best solution to choose. Later I changed to
the rsync deamon for backups.
One important thing was for me that my Computers can switch the harddisk. I mean my Linux computers and also headless. I also know some smart wall sockets, but I never heard about a socket that can be controlled by a command sent with curl.
I only know that I can control them by using a app on my smartphone. But this is not my first interest. And while I already had the relay and the Raspberry shold also be the target for the backups, it was clear to use the Raspberry and the
relay for switching.
Electrical Circuit
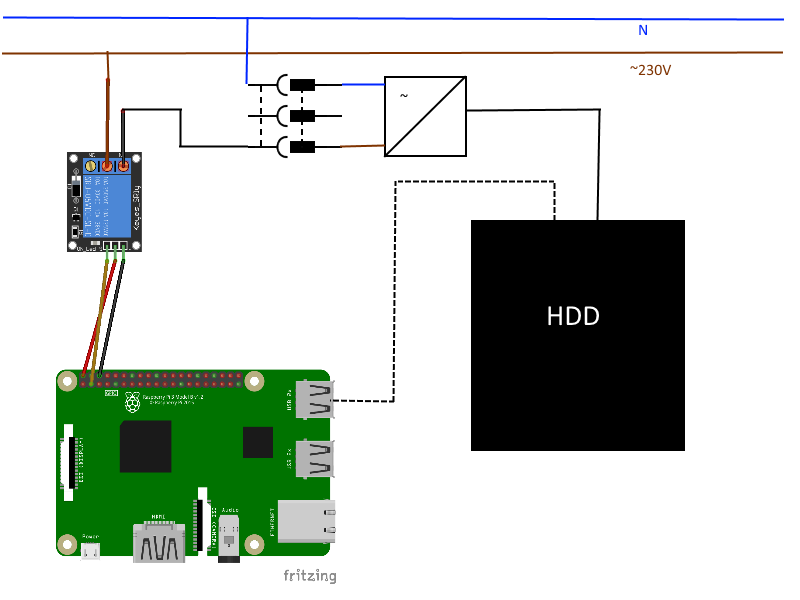
Nevertheless the functioning of a smart socket was needed. My plan was to make the electronical part of the smart socket by myself. But normally they have a small build in controller that wants to connect (e.g. via WLAN as a new network device). But also when you have one, which is controlled via WLAN channel, you control it by using a app on your smartphone. But I here wanted to let my computer switch remotely for doing backups in the night. And in the night I never want to switch it manually on a app. And I don't know if it is possible to control such a socket like I made it here, so I wanted that the Raspberry does it.
To be able to switch the Harddisk I bought a adapter plug which offers the option to self connect a switch. This was good, because I only had to connect a short cable to the connector of the relay. On the second wire the power goes back to the adapter plug. The power supply is only plugged into the adapter plug and the switching works only using the relay, respective the Raspberry Pi. The Raspberry Pi is connected to the relay only with 5V, GND and a signal wire. What is not easy to overview is that also in reality a 5V power source must be connected and the signal wire crosses the power wire. Further the relay has a NC-contact and a NO-contact. But unfortunately it is not drawn or described. To get the knowledge of this I had to make a passthrough test. I had no datasheet for it. The Harddisk was only connected via a USB cable to transmit the data.
Script for switching on GPIO
To be able now to switch, you also need a bit software. Sadly at this time I don't know how easy it is to make a program in C for doing so. But I know already a solution by using shell commands. So I made this by this way. For that the Raspberry Pi is able to use the GPIO to switch the relay, it's port must be set as an output. This needs to be done every reboot, so that must be done on any init. So there is the following line in the /etc/rc.local:
gpio export 2 out
When the harddisk now shold be activated, it just need to call a script with a parameter. The script need to know which action it shold be done. While the space on this page is a bit to small I don't write here the lines that will check the abmount of given parameters for the script and the check of it. For activating it will call the script just with a string parameter "reqhd". This will set the GPIO pin on and after that wait for 15 seconds. This time need the harddisk to spin up. After this time the mount command is called to mount the dik to the file system (an entry into the /etc/fstab was done).
                            gpio -g write 2 1

                            sleep 15s

                            mount /mnt/sark &> /home/pi/sarkmount/mnt-msg.txt

                            echo "mnt result: $?" >> /home/pi/sarkmount/mnt-msg.txt
It is not more difficult to deactivate the disk. Here it will call with the "finhd" parameter, that will first call sync and then wait 10 seconds. This is extra, because the disk have a moment to write down last changes. Only ater that it will unmount the disk. With using the -l option, it will do this forced, therefor I have to call the sync command. Is the unmount done, the script will normally check if it is really done - I don't show that here caused by the missing space. If also this was done, than only the GPIO pin must set down.
                            sync

                            sleep 10s

                            umount -l /mnt/sark &> /home/pi/sarkmount/umnt-msg.txt

                            echo "umnt result: $?" >> /home/pi/sarkmount/umnt-msg.txt

                            echo -n 0 > /home/pi/sarkmount/reg.txt

                            gpio -g write 2 0

                            echo 2
Webinterface to control harddisk manually
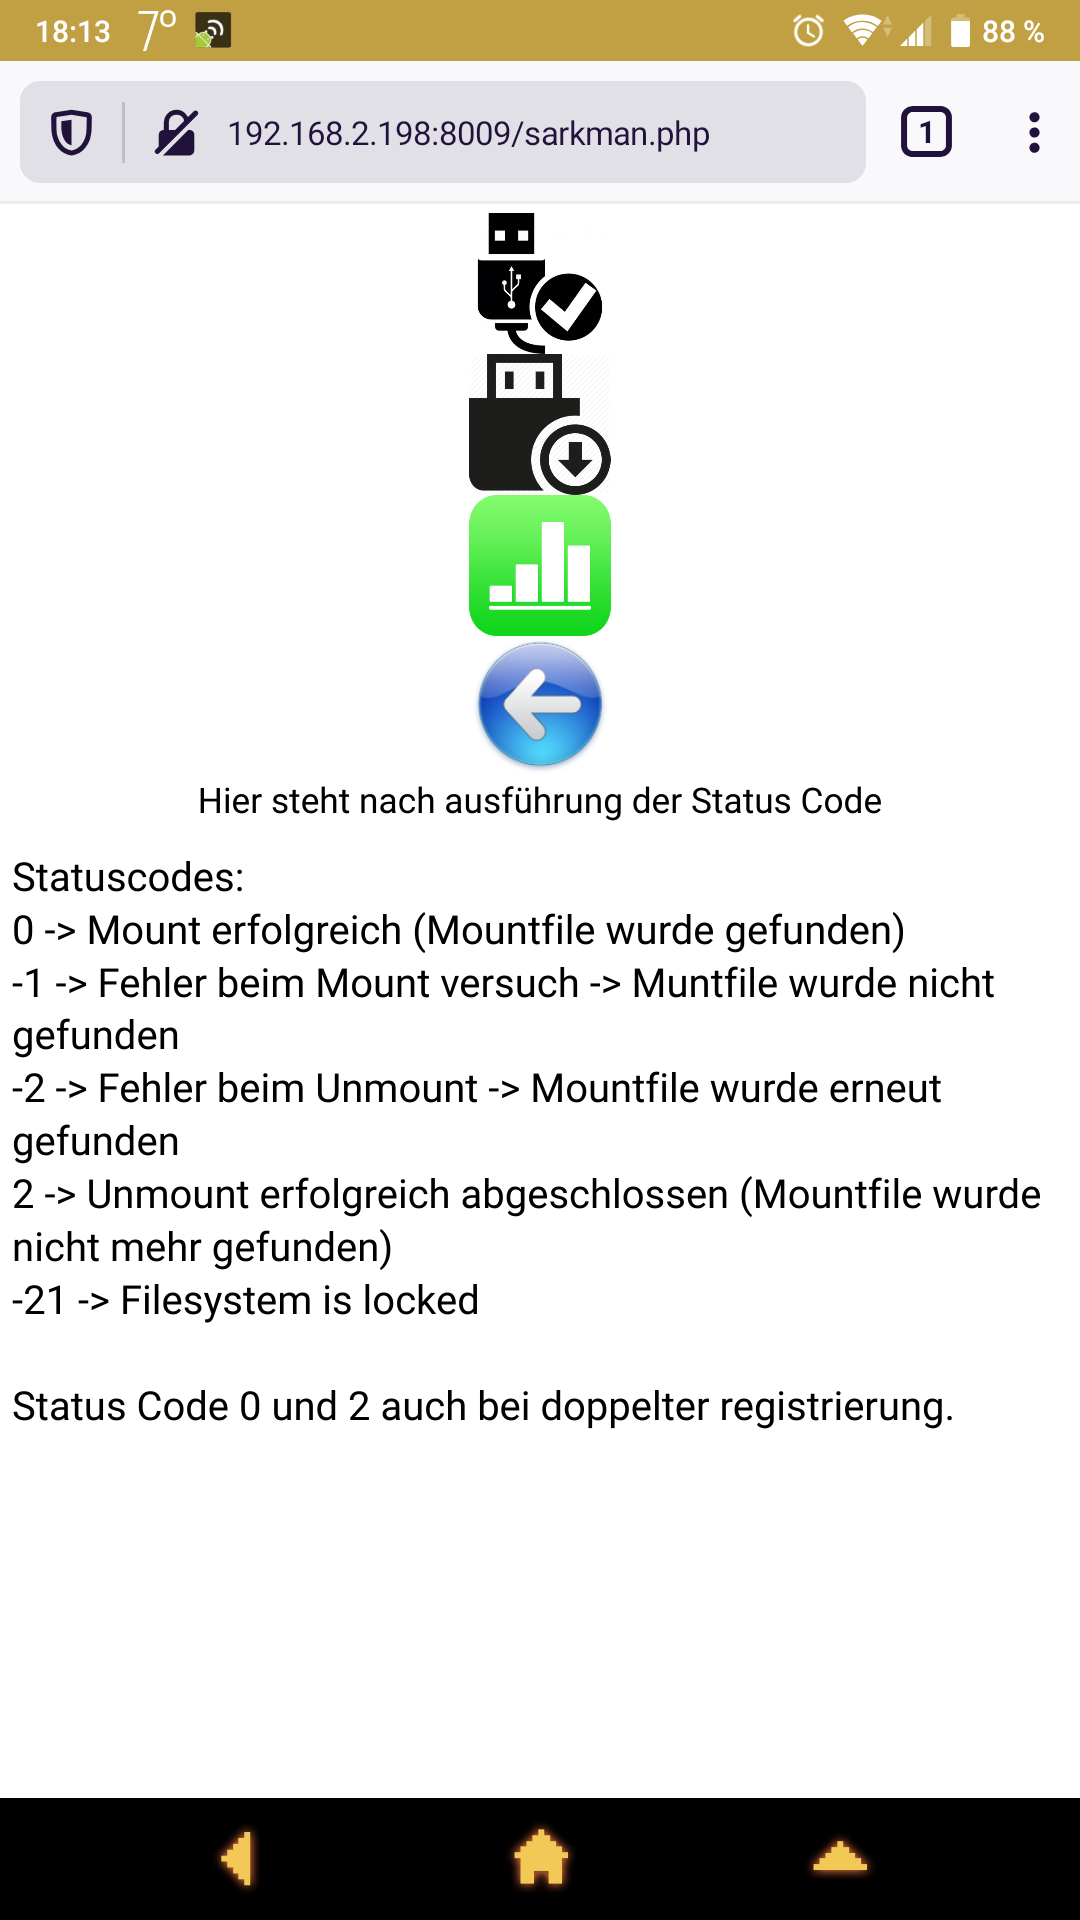
The remote control shold be done on client side using "curl". While this is not possible with normal smart sockets, I had to build make my own web based control. Sadly I think, when I had known before how easy it is to build a
program in C and use it as CGI script in a webserver to control anything, I don't had it done in this way.
To send back the status the scripts write out status values that the server will send back. This was originally build such as the Raspberry Pi has a Apache webserver with PHP installed and called the scripts by itself. The PHP script get
the parameter just by HTTP GET requests and forwards the parameter to the shell script. But leter the security policies on debian were set stronger which caused that the mount state of the disk not stay after the runtime of the PHP script.
But I wanted to continue the web interface. Therefore I had setup a solution with PHP to connect with a SSH connection to "localhost" and then call the command.
If someone wants to access the disk manually, I build the web interface shown in the picture. If the user just click one of the picture buttons, it will call the same commands. The Page calls it self (it is also written in PHP) with the
parameter and this will trigger the executing script just before build the output page and send it back.
It is possible that there are more accesses then one. A user just can register on the system while a backup is done. Then it will check if it can disable the disk or it will just reduce the count of registered users. To show this number on
the page there is a "meter" button, that will request the number of registered clients.
Client Script for automatically backup
On the client side which will do an automated backup here is just a script which just uses curl to call the server and reads the returned value. A script encapsulate the call to request the harddisk and stores the return value, which is recived via HTTP in a file.
curl -X GET http://backupserver/com.php?str=reqhd > bu_stat.txt
This part is duplicated for deactivating:
curl -X GET http://backupserver/com.php?str=finhd > bu_stat.txt
if [ $(cat bu_stat.txt) -eq 0 ]

then

    rsync -rhtEl --partial --inplace --chmod=D755,F644 --delete --force $2 /media/sda1/ rsync://backupserver/bu/pi_sda1

    sleep 60s && /root/bu_fin.sh

else

    echo "Not working"

fi
The main script reads the stored value to determine if the harddisk is successful activated. If it says that everything is as it be expected, rsync gets called to mirror the files. It is possible to write mutiple lines for rsync to backup for example mutiple volumes. After all if the job is done it fires up only the script to deactivate the harddisk. The whole process runs as user "root" because it has to backup files from diffrent owners and rsync has to do actions like change the timestamps of the files.
On my notebook is also such a script. Because this is not 24/7 online, I start it manually (a automation with anacron is not possible).
On the server side is the script stored into the crontab, which now runs this script every first day of a month at midnight. This will backup all data just after every month. Will I make the backup more frequently, I just setup a shorter interval time in cron. If I want only to backup something special with it's own interval, I just copy the script, change some lines in it and put its name together with the special interval into the crontab. Also there is the option to run the script manually from the terminal and call it with a second parameter. My idea was to set the rsync switch --progress, to get more informations about the copy tasks when run manually.